
Understanding the Essential Components of a Lower Parts Kit
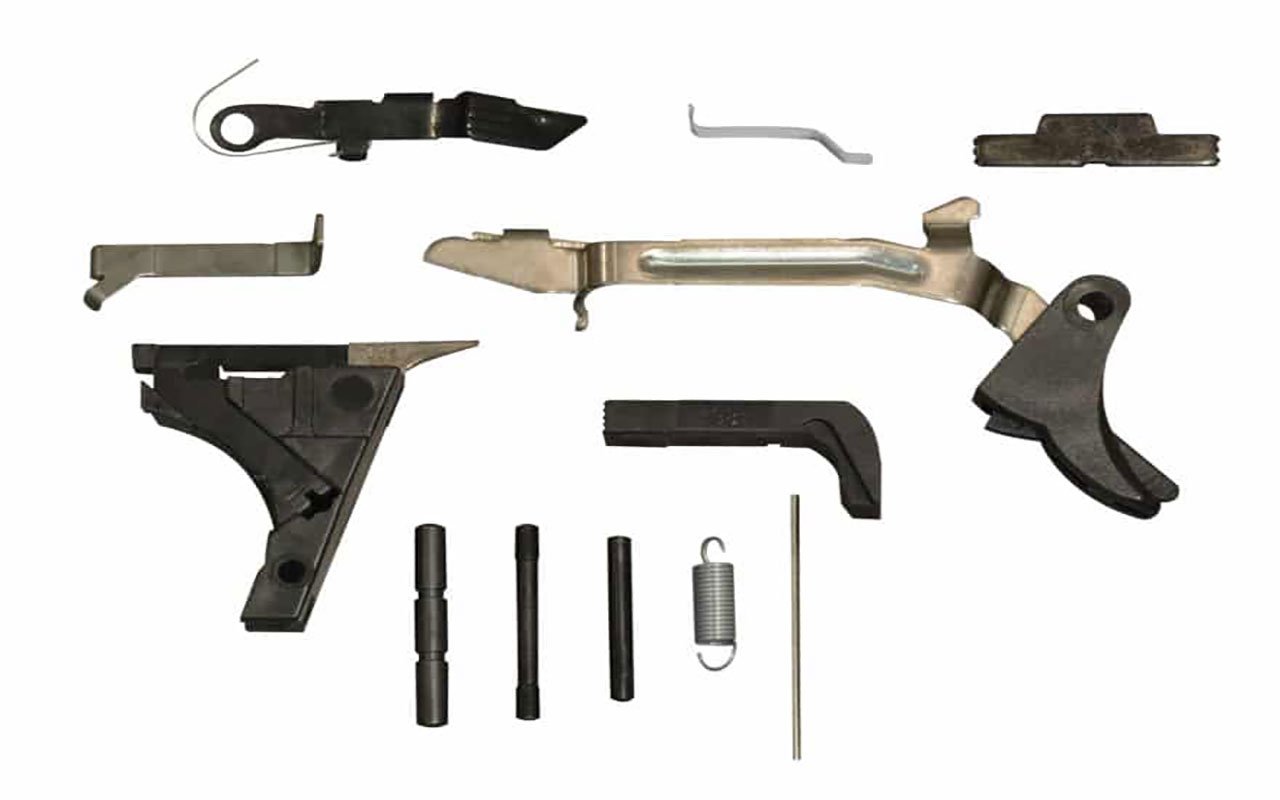
The lower parts kit (LPK) is crucial when building a 3rd Gen Glock 17 compatible pistol. This kit contains various essential parts that work together to ensure the firearm’s proper functioning. Understanding each part’s role in the assembly can assist users in appreciating the entire build process and selecting the best components for their needs.
One of the primary components included in the LPK is the trigger assembly. The trigger mechanism initiates the firing sequence; thus, its design must provide a smooth and reliable pull. In addition to the trigger, the kit typically contains the trigger bar, which connects the trigger to the firing pin block, ensuring that the firearm operates effectively with minimal backlash.
The LPK also consists of the disconnector, which plays a significant role in maintaining safety by preventing the firearm from firing again until the trigger is reset. The connector modifies the trigger pull weight and helps provide a consistent user experience. Together with the trigger and disconnector, these components form a reliable engagement system that enhances the shooting experience.
Further essential components include the locking block and slide stop lever, contributing to the pistol’s overall operation and safety features. The locking block secures the slide in its proper position during firing, while the slide stop allows the user to stop the slide manually. These parts work in unison to promote reliable ammunition cycling and easy firearm handling.
OEM parts are highly recommended for building a Glock 17, as these components ensure optimal reliability and compatibility. OEM parts are crafted to exact specifications, providing consistency in performance compared to aftermarket alternatives. Ultimately, understanding these essential components strengthens the building’s integrity and enhances the user’s confidence in the firearm’s operation.
Easy Installation Guide for Your Lower Parts Kit
Assembling your Glock 17 lower using the original equipment manufacturer (OEM) lower parts kit can be a rewarding experience. First, ensure you have all the tools on hand, including a punch set, a hammer, a flathead screwdriver, and a small pair of pliers. A clean, well-lit workspace will also enhance your efficiency and accuracy during installation.
Start by preparing your lower receiver. Before installation, inspect the receiver to ensure it is free from debris or obstructions. Lay out your OEM lower parts kit and verify that all components are included. This kit typically includes the trigger assembly, hammer, disconnector, slide stop lever, and magazine release. Identifying these parts before you commence can streamline the assembly process.
Begin the installation with the trigger assembly. Position the trigger into its designated slot within the lower receiver. Carefully tap the pins into place using your punch set, ensuring they are seated evenly. Following this, install the hammer and disconnector, aligning the components as the Glock assembly manual specified.
Next, install the slide stop lever. This component can be tricky; gently depress the spring as you insert the slide stop into the lower. After it is secured, move on to the magazine release button. This can typically be accomplished by pushing it through the frame and securing it with a retaining pin.
As you go through the installation, be aware of potential issues. If any parts seem resistant to installation, do not force them. Instead, re-evaluate the alignment and positioning of components. Once all parts are installed, conduct a thorough function check to ensure that the trigger operates correctly and all components are seated properly.
Completing this guide will provide you with a fully operational lower receiver for your Glock 17. With attention to detail and patience, the assembly process can be both enjoyable and educational for firearm enthusiasts.


